Skip to Content
Automower® support
How and when to change the blades on your Automower® robotic lawn mower
To keep your lawn in perfect shape, it’s important to replace the cutting blades on your Automower® robotic lawn mower regularly. Worn blades not only reduce cutting quality but can also strain the lawn mower and increase energy usage.
Running your lawn mower with dull or damaged blades can:
Cause uneven grass cuts
Increase battery and energy use
Reduce overall mowing efficiency
When should you replace the blades?
You should change the blades when you notice:
Frayed or whitened grass tips after mowing
Visible signs of wear or damage on the blades
Blade lifespan of Automower® cutting blades
The lifespan of Automower® cutting blades varies based on several factors:
Mowing frequency and duration: more frequent mowing increases wear
Lawn size and grass type: larger areas and tougher grass varieties require more frequent replacement
Seasonal growth rate: rapid growth periods demand more cutting action
Soil conditions and fertiliser use: sandy soil and certain fertilisers can accelerate blade dulling
Obstacles in the lawn: contact with toys, stones, twigs and roots causes additional wear
Expected blade lifespan:
Main disc blades typically last 3 to 6 weeks under normal conditions
EdgeCut disc blades generally last 9 to 12 weeks as they are only activated during edge cutting operations
Seasonal tip: Spring blade check
During spring, grass is richer in sap and grows faster. This can lead to sticky buildup on blades. Inspect and clean or replace blades more frequently during this season to maintain cutting performance.
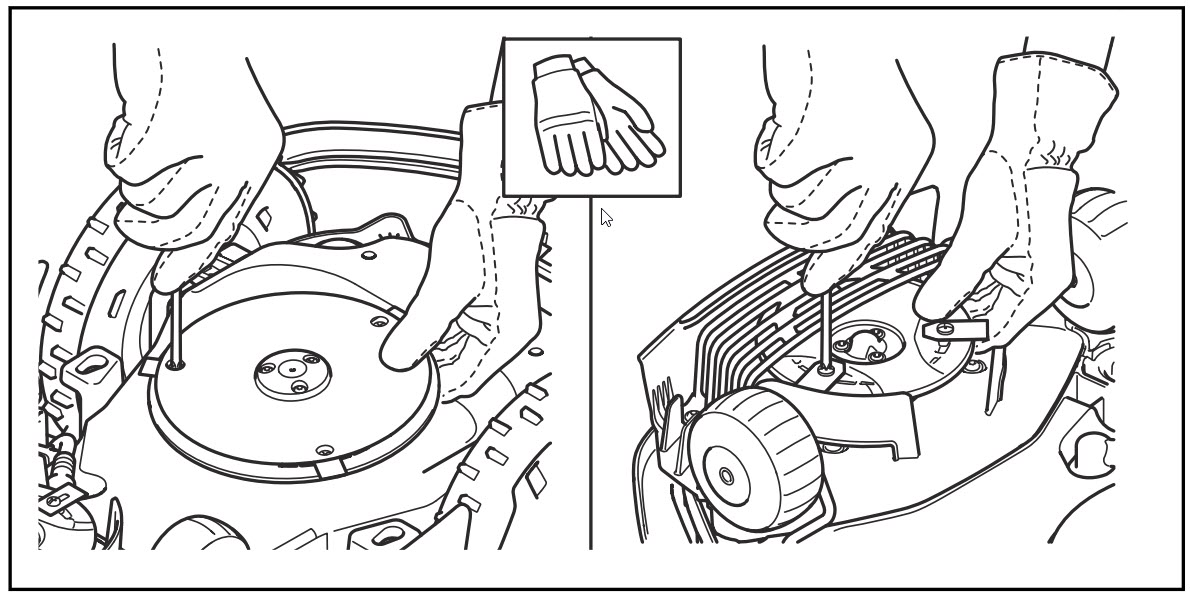
Main blade disc and EdgeCut disc
A main cutting disc is available on all Automower® robotic lawn mowers (left side in the illustration below).
An EdgeCut disc is only available on Automower® models equipped with EdgeCut (right side in the illustration below). Learn more about EdgeCut here.
The procedure for changing blades is the same for both cutting discs.
Use original Husqvarna blades and screws
For optimal safety and performance:
Always use original Husqvarna blades and screws.
Replace screws each time you change blades.
Reusing screws may lead to blades coming loose during operation.
Blades should spin freely when correctly installed. This is a safety feature, not a defect.
Avoid mixing different blade types or combining new and old blades. This can cause cutting disc imbalance, resulting in noise or vibrations.
Step-by-step: How to change cutting blades
You’ll need:
Protective gloves
Screwdriver (flat or cross-tip, and ideally magnetic)
Soft cloth and brush
Follow these steps:
Put on the gloves.
Set the mower to OFF (For mowers with a jogwheel: Turn the jog wheel until you see Power off, then press the jog wheel. For lawn mowers with a keypad: Locate the ON/OFF button at the back or bottom of the lawn mower. For Aspire R4, the ON/OFF button is located on the keypad).
Turn the mower upside down on a clean, soft surface to avoid scratches on the cover.
Rotate the skid plate until the hole on the plate aligns with the blade screw.
Unscrew the old blade.
Clean any dirt using a brush and a soft damp cloth.
Attach the new blade with a new screw.
Ensure to only use one blade per screw.
Repeat for all blades and verify that the blades spin freely.
Blades must spin freely
Your blades should pivot easily on the screws. This is correct installation, not a problem. The blades are designed to spin freely for safety reasons. When the blade hits an obstacle (like a stone or root), it rotates away to prevent damage to the mower and the blade itself.
Tracking blade usage with the app
The Automower® Connect app includes a blade timer feature. After replacing the blades on your robotic mower, reset the usage timer in the Automower® Connect app to track blade life. The app will track operating hours from that point.
To access and reset the blade timer:
Open the Automower® Connect app
Tap More
Select Statistics
Scroll to Blade Usage and tap Reset under the usage hours
Related topics: How to clean Automower® | What is EdgeCut and how do I use it? | Why is Automower® making a buzzing sound?